Wednesday 22 November 2017

Hyper-V option for VMWare and Docker


- For VMWare > Off the Hyper-V
    . Run cmd with admin


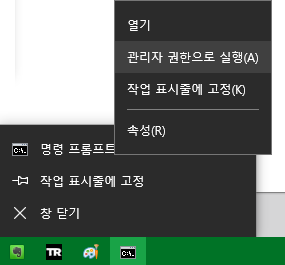
bcdedit /set hypervisorlaunchtype off
and restrat PC 

- For Docker > On the Hyper-V
  
bcdedit /set hypervisorlaunchtype auto
and restrat PC 

Sunday 12 November 2017

AWS Initial Setup


1. AWS CLI ( Command Line Interface )
  - Installation : http://docs.aws.amazon.com/ko_kr/cli/latest/userguide/installing.html
  - Configuration : http://docs.aws.amazon.com/ko_kr/cli/latest/userguide/cli-chap-getting-started.html

2. setup proxy if you need - hppt or https

  2.1.   setup proxy with window system (Permanent)
               https://docs.cloudfoundry.org/cf-cli/http-proxy.html
  2.2.   setup proxy with window system (Temporarily)
       C:\Users\hwangki>set HTTP_PROXY=http://web-proxy.sg.hpicorp.net:8080
       C:\Users\hwangki>set HTTPS_PROXY=http://web-proxy.sg.hpicorp.net:8080

3. AWS CLI test
C:\Users\hwangki>aws ec2 describe-availability-zones
{
    "AvailabilityZones": [
        {
            "State": "available",
            "ZoneName": "ap-southeast-2a",
            "Messages": [],
            "RegionName": "ap-southeast-2"
        },
        {
            "State": "available",
            "ZoneName": "ap-southeast-2b",
            "Messages": [],
            "RegionName": "ap-southeast-2"
        },
        {
            "State": "available",
            "ZoneName": "ap-southeast-2c",
            "Messages": [],
            "RegionName": "ap-southeast-2"
        }
    ]
}


Wednesday 17 May 2017

[AWS] Web Connection under linux

http://docs.aws.amazon.com/AmazonRDS/latest/UserGuide/CHAP_Tutorials.WebServerDB.CreateWebServer.html

Install an Apache web server with PHP

Next you connect to your EC2 instance and install the web server.
To connect to your EC2 instance and install the Apache web server with PHP
  1. To connect to the EC2 instance that you created earlier, follow the steps in Connect to Your Instance.
  2. To get the latest bug fixes and security updates, update the software on your EC2 instance by using the following command:
    Note
    The -y option installs the updates without asking for confirmation. To examine updates before installing, omit this option.
    Copy
    [ec2-user ~]$ sudo yum update –y
  3. After the updates complete, install the Apache web server with the PHP software package using the yum install command, which installs multiple software packages and related dependencies at the same time:
    Copy
    [ec2-user ~]$ sudo yum install -y httpd24 php56 php56-mysqlnd
  4. Start the web server with the command shown following:
    Copy
    [ec2-user ~]$ sudo service httpd start
    You can test that your web server is properly installed and started by entering the public DNS name of your EC2 instance in the address bar of a web browser, for example: http://ec2-42-8-168-21.us-west-1.compute.amazonaws.com. If your web server is running, then you see the Apache test page. If you don't see the Apache test page, then verify that your inbound rules for the VPC security group that you created in Tutorial: Create an Amazon VPC for Use with an Amazon RDS DB Instance include a rule allowing HTTP (port 80) access for the IP address you use to connect to the web server.
    Note
    The Apache test page appears only when there is no content in the document root directory, /var/www/html. After you add content to the document root directory, your content appears at the public DNS address of your EC2 instance instead of the Apache test page.
  5. Configure the web server to start with each system boot using the chkconfig command:
    Copy
    [ec2-user ~]$ sudo chkconfig httpd on
To allow ec2-user to manage files in the default root directory for your Apache web server, you need to modify the ownership and permissions of the /var/www directory. In this tutorial, you add a group namedwww to your EC2 instance, and then you give that group ownership of the /var/www directory and add write permissions for the group. Any members of that group can then add, delete, and modify files for the web server.
To set file permissions for the Apache web server
  1. Add the www group to your EC2 instance with the following command:
    Copy
    [ec2-user ~]$ sudo groupadd www
  2. Add the ec2-user user to the www group:
    Copy
    [ec2-user ~]$ sudo usermod -a -G www ec2-user
  3. To refresh your permissions and include the new www group, log out:
    Copy
    [ec2-user ~]$ exit
  4. Log back in again and verify that the www group exists with the groups command:
    Copy
    [ec2-user ~]$ groups ec2-user wheel www
  5. Change the group ownership of the /var/www directory and its contents to the www group:
    Copy
    [ec2-user ~]$ sudo chown -R root:www /var/www
  6. Change the directory permissions of /var/www and its subdirectories to add group write permissions and set the group ID on subdirectories created in the future:
    Copy
    [ec2-user ~]$ sudo chmod 2775 /var/www [ec2-user ~]$ find /var/www -type d -exec sudo chmod 2775 {} +
  7. Recursively change the permissions for files in the /var/www directory and its subdirectories to add group write permissions:
    Copy
    [ec2-user ~]$ find /var/www -type f -exec sudo chmod 0664 {} +

Connect your Apache web server to your RDS DB instance

Next, you add content to your Apache web server that connects to your Amazon RDS DB instance.
To add content to the Apache web server that connects to your RDS DB instance
  1. While still connected to your EC2 instance, change the directory to /var/www and create a new subdirectory named inc:
    Copy
    [ec2-user ~]$ cd /var/www [ec2-user ~]$ mkdir inc [ec2-user ~]$ cd inc
  2. Create a new file in the inc directory named dbinfo.inc, and then edit the file by calling nano (or the editor of your choice).
    Copy
    [ec2-user ~]$ >dbinfo.inc [ec2-user ~]$ nano dbinfo.inc
  3. Add the following contents to the dbinfo.inc file, where endpoint is the endpoint of your RDS MySQL DB instance, without the port, and master password is the master password for your RDS MySQL DB instance.
    Note
    Placing the user name and password information in a folder that is not part of the document root for your web server reduces the possibility of your security information being exposed.
    Copy
    endpoint
'); define('DB_USERNAME', 'tutorial_user'); define('DB_PASSWORD', 'master password'); define('DB_DATABASE', 'sample'); ?>
  • Save and close the dbinfo.inc file.
  • Change the directory to /var/www/html:
    Copy
    [ec2-user ~]$ cd /var/www/html
  • Create a new file in the html directory named SamplePage.php, and then edit the file by calling nano (or the editor of your choice).
    Copy
    [ec2-user ~]$ >SamplePage.php [ec2-user ~]$ nano SamplePage.php
  • Add the following contents to the SamplePage.php file:
    Note
    Placing the user name and password information in a folder that is not part of the document root for your web server reduces the possibility of your security information being exposed.
    Copy

    Sample page

    Name Address
    "; echo "", "", ""; echo "
    ID Name Address
    ",$query_data[0], "",$query_data[1], "",$query_data[2], "
  • "; } ?> Error adding employee data."); } /* Check whether the table exists and, if not, create it. */ function VerifyEmployeesTable($connection, $dbName) { if(!TableExists("Employees", $connection, $dbName)) { $query = "CREATE TABLE `Employees` ( `ID` int(11) NOT NULL AUTO_INCREMENT, `Name` varchar(45) DEFAULT NULL, `Address` varchar(90) DEFAULT NULL, PRIMARY KEY (`ID`), UNIQUE KEY `ID_UNIQUE` (`ID`) ) ENGINE=InnoDB AUTO_INCREMENT=1 DEFAULT CHARSET=latin1"; if(!mysqli_query($connection, $query)) echo("Error creating table.
    "); } } /* Check for the existence of a table. */ function TableExists($tableName, $connection, $dbName) { $t = mysqli_real_escape_string($connection, $tableName); $d = mysqli_real_escape_string($connection, $dbName); $checktable = mysqli_query($connection, "SELECT TABLE_NAME FROM information_schema.TABLES WHERE TABLE_NAME = '$t' AND TABLE_SCHEMA = '$d'"); if(mysqli_num_rows($checktable) > 0) return true; return false; } ?>
  • Save and close the SamplePage.php file.
  • Verify that your web server successfully connects to your RDS MySQL DB instance by opening a web browser and browsing to http://EC2 instance endpoint/SamplePage.php, for example:http://ec2-55-122-41-31.us-west-2.compute.amazonaws.com/SamplePage.php.
  • You can use SamplePage.php to add data to your RDS MySQL DB instance. The data that you add is then displayed on the page.
    To make sure your RDS MySQL DB instance is as secure as possible, verify that sources outside of the VPC cannot connect to your RDS MySQL DB instance.